AERATED CONCRETE MASONRY BLOCKS
Section outline
-
-
Introduction
Aerated concrete masonry block has excellent thermal insulation properties and low density, making it lightweight and fast construction possible.
Other advantages include good acoustic properties, plaster resistance, easy cutting and carving, and high dimensional accuracy.
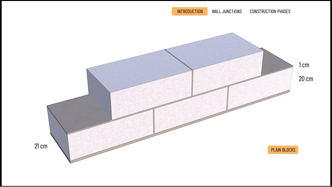
Nowadays, blocks can be plain, hand-grip, or tongue-and-groove items. The blocks are laid in a stretcher course only, with typical lengths of 50 or 60 centimetres and widths of 30, 37.5 and 50 centimetres, which determine the wall thickness. The average height of the blocks is 20 centimetres.The typical joint size is 1 centimetre, which gives a course height of 21 centimetres. As it is shown, the plain blocks should be laid with a vertical mortar joint. In this case too, the blocks are laid according to the general rules for brick bonding, but the vertical joints do not have to be in the centre axis. However, the connection between the blocks must be at least 12.5 centimetres.
The preceding information also applies to hand-grip blocks, and mortar must be used for vertical gaps. However, the vertical joints of the tongue-and-groove blocks are already dry-built. Furthermore, in this case, only thin-bed masonry mortar can be used. This results in joints only two millimetres thick, which is both material-saving and significantly reduces the amount of thermal bridging. Particular attention must be paid to precisely adjusting the level of the first course, similar to thin mortar solutions for clay blocks.
Wall Junctions
Using a sample wall, we will investigate the wall connections of 37.5 centimetre-wide aerated concrete masonry block.
The type of blocks used is a tongue-and-groove one with handles, measures 37.5 x 60 x 20 centimetres.
The allocation of blocks is planned as follows:a) Wall corner - Start the course with a whole block from the corner in alternating courses, and the joints will be correct throughout the wall.
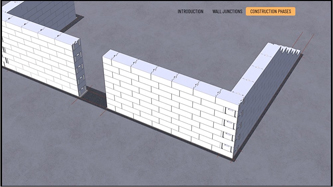
The wall thickness of 37.5 cm and an element length of 60 cm give an offset of 22.5 cm in both connecting walls, greater than the minimum requirement of 12.5 cm.b) Wall end - When forming the wall end, we also start with a whole block in the first course. In the next course, place a cut block on the wall end by the block bond plan. As previously planned, the cut blocks will be half, that is 30 cm.
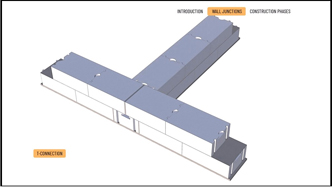
c) Tee connection - In our example we assume that our main wall section already contains two wall corners, bonded as described earlier, with whole-element distances from the corners to the sides of the perpendicularly adjoining wall. Based on this the bonding overlaps are 22.5 centimetres in both directions, in a symmetrical setting.
We bond the adjoining wall to the main wall already in the first course, placing a whole block.
Because of the wall width of 37.5 centimetres, the piece of 60 centimetres length will overhang the main wall with 22.5 centimetres - this will be the overlap size in this wall section too.In our main wall two cut elements will be symmetrically placed upon the adjoining whole block, placing the joint on the center line of the joining wall.
The length of the cut elements is 56.5 centimetres, leaving a vertical joint of 1 centimetre that we fill with mortar.The construction phases are as follows:
-
We set the walls, connections, and openings on the reinforced concrete slab with a chalk line.
-
The damp proof course under the wall is fixed to the reinforced concrete slab, and the crucial points are marked again.
-
2-3 centimetres of mortar is applied for the first course using a trowel, a levelling tool and a levelling bar.
Place the whole blocks of the corner and the wall ends into the fresh mortar layer.
For the T-junction place two cut blocks symmetrically onto the central axis of the adjoining wall, and fill the vertical joint with mortar.
The size of the cut elements must be 48 cm so to maintain a half offset (30 cm) in this section of the wall, closed by the two wall ends.
The whole block of the adjoining wall butts into the main wall.
Use a levelling bar and a rubber mallet for horizontal and vertical adjustments. - A masonry cord is stretched out between the already placed blocks, and the filler (stretcher) masonry is done here.
The blocks will be laid along the original plan without any vertical mortar joints. - Check the levelness and sand the surface if there is more than one millimetre of unevenness.
- Starting from the next course, thin bed mortar is used, which is applied to the surface with a mortar roller.
- This time too, the key blocks are placed first: the whole block of the the T-junction and the half-bats of the wall ends.
- Again, we use masonry cords for laying the filler (stretcher) blocks.
- Using the levelling bar and rubber mallet, ensure the level and plumb as earlier, while alternating the two types of courses.
-
-


